> ## Documentation Index
> Fetch the complete documentation index at: https://makeswift-sasha-eng-8460-create-a-guide-for-troubleshooting.mintlify.site/llms.txt
> Use this file to discover all available pages before exploring further.
# App Router
The fastest way to get started with Makeswift on a new Next.js project is to follow the
[quickstart](/developer/quickstart) guide. If you have an existing Next.js application
or want to set things up yourself, continue with the rest of this guide.
This installation guide is built for [Next.js
15](https://nextjs.org/blog/next-15) but also works with [Next.js
13](https://nextjs.org/blog/next-13) and [Next.js
14](https://nextjs.org/blog/next-14).
## System requirements
* [Node.js 18.17](https://nodejs.org/en) or a later version.
* macOS, Windows (including WSL), and Linux are supported.
## Project Setup
This code in this guide assumes you are using a `src` directory and have the following path aliases configured.
```json tsconfig.json
{
"compilerOptions": {
"baseUrl": ".",
"paths": {
"@/*": ["src/*"]
}
}
}
```
If your setup varies from this, please adjust the code snippets appropriately.
## Getting started
First, open your Next.js project. If you don't already have one, head over to
the [Next.js](https://nextjs.org/docs/getting-started/installation)
documentation to get one set up. If you do have one, please verify you are using [Next.js 13.4](https://nextjs.org/blog/next-13-4) or a later version that is using [App Router](https://nextjs.org/docs/getting-started/installation).
If you are not using App Router, here's how to [incrementally adopt](https://nextjs.org/docs/app/building-your-application/upgrading/app-router-migration) it.
Install the `@makeswift/runtime` package. This package contains all of the necessary
code to integrate Makeswift into your Next.js app.
```bash
npm install @makeswift/runtime
```
Requesting data through the `Makeswift` client requires a site API key from Makeswift. In the Makeswift builder, go to **Settings > Host** and copy the API key for the site.
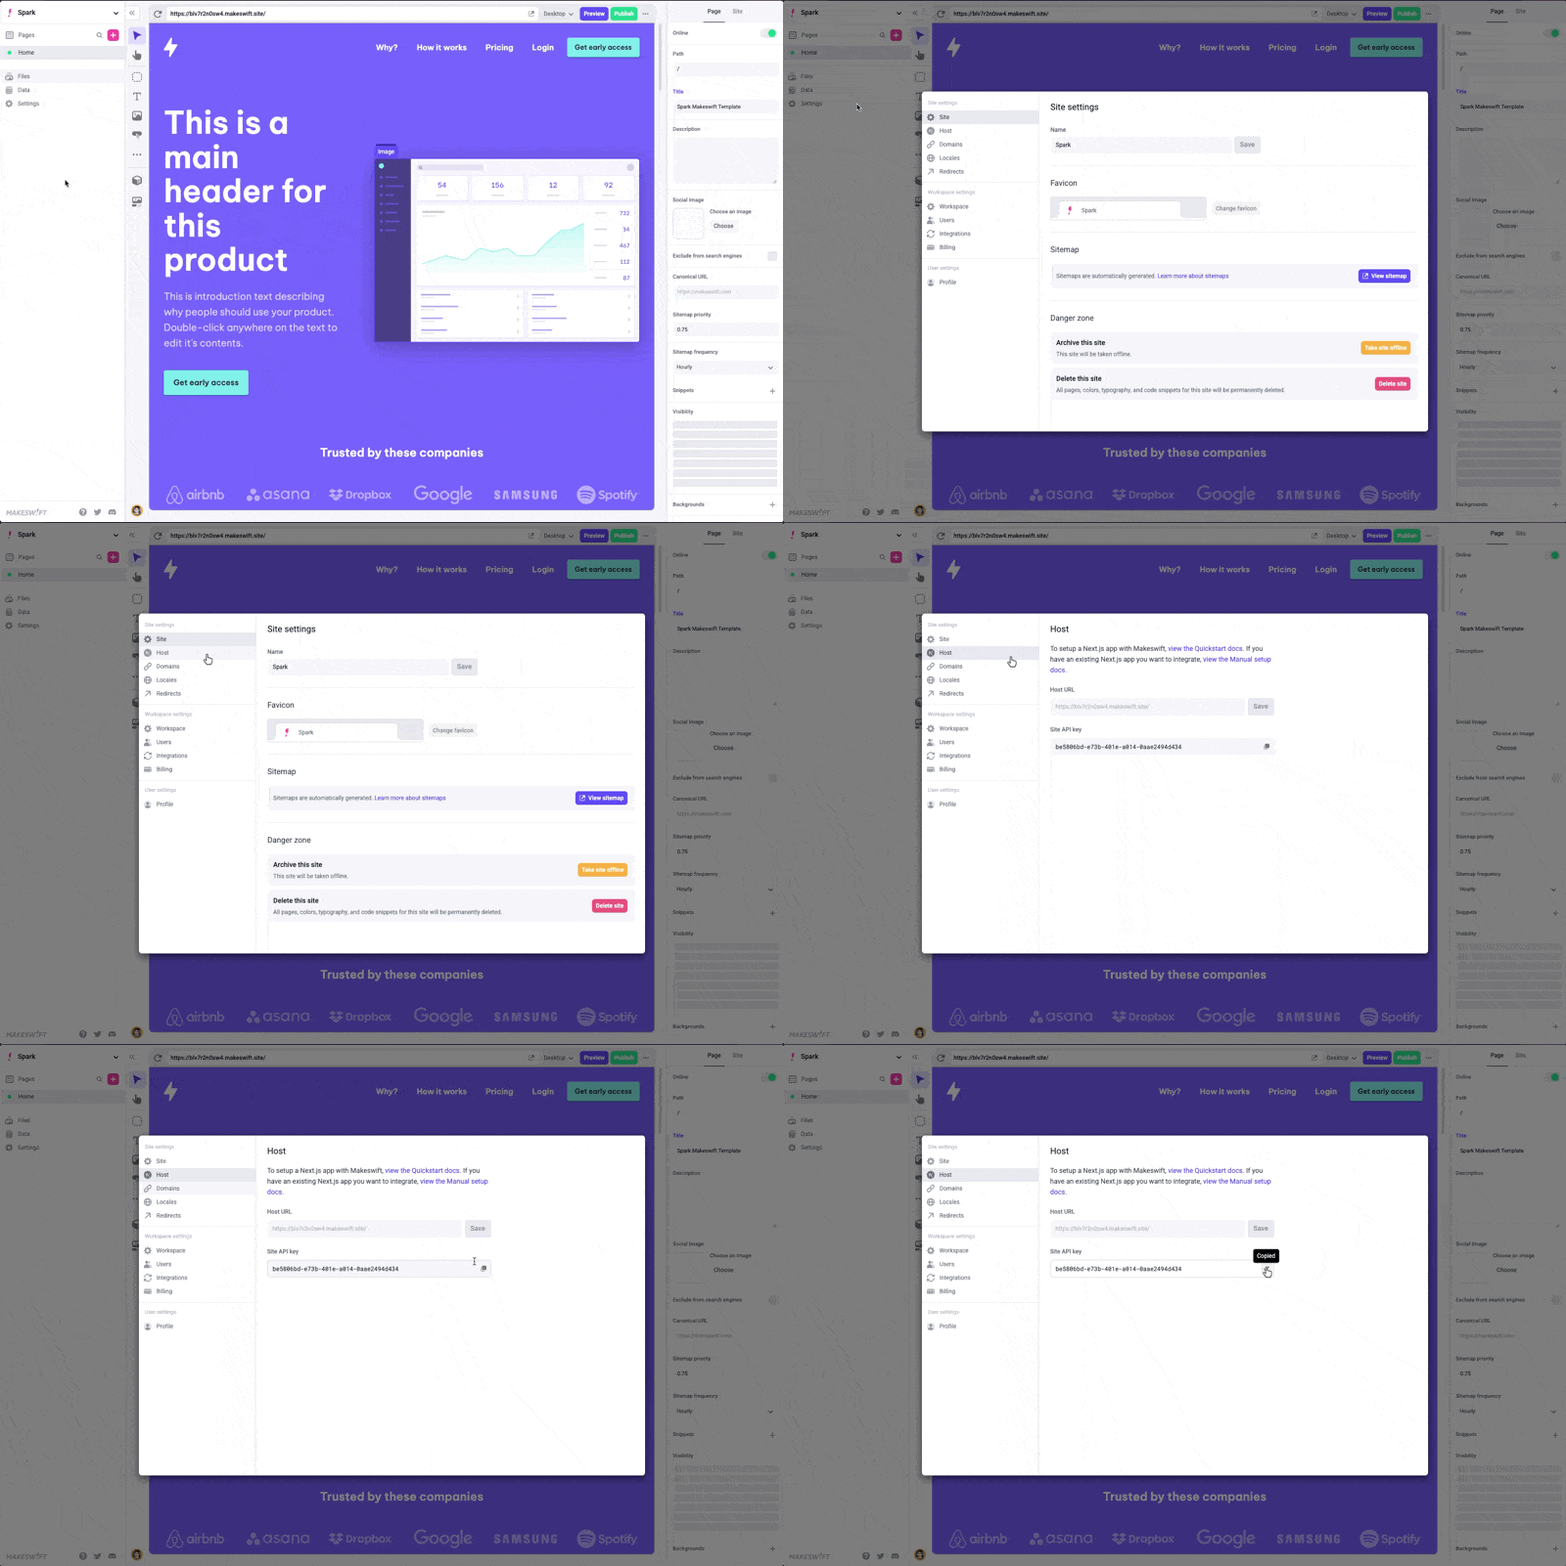 Once the API key is in your clipboard, open your [`.env.local`](https://nextjs.org/docs/pages/building-your-application/configuring/environment-variables) file and paste the snippet below.
```sh
MAKESWIFT_SITE_API_KEY=paste-your-api-key-here
```
Create the Makeswift [runtime](/developer/reference/runtime/constructor) file in `src/makeswift`.
```ts src/makeswift/runtime.ts
import { ReactRuntime } from "@makeswift/runtime/react";
export const runtime = new ReactRuntime();
```
Create the Makeswift [client](/developer/reference/client/constructor) file in `src/makeswift`.
```ts src/makeswift/client.ts
import { Makeswift } from "@makeswift/runtime/next";
import { strict } from "assert";
import { runtime } from "./runtime";
strict(
process.env.MAKESWIFT_SITE_API_KEY,
"MAKESWIFT_SITE_API_KEY is required"
);
export const client = new Makeswift(process.env.MAKESWIFT_SITE_API_KEY, {
runtime,
});
```
Similar to [NextAuth.js](https://next-auth.js.org/), Makeswift uses an API handler to communicate with your Next.js app. Create the file `src/app/api/makeswift/[...makeswift]/route.ts`.
It is important this file has that exact name and path. The extension can be
`.js` or `.ts`.
```tsx src/app/api/makeswift/[...makeswift]/route.ts
import { MakeswiftApiHandler } from "@makeswift/runtime/next/server";
import { strict } from "assert";
import { runtime } from "@/makeswift/runtime";
// make custom components' data available for introspection
import "@/makeswift/components";
strict(
process.env.MAKESWIFT_SITE_API_KEY,
"MAKESWIFT_SITE_API_KEY is required"
);
const handler = MakeswiftApiHandler(process.env.MAKESWIFT_SITE_API_KEY, {
runtime,
});
export { handler as GET, handler as POST };
```
This API route adds support for
[Draft Mode](https://nextjs.org/docs/app/building-your-application/configuring/draft-mode),
[on-demand revalidation](https://nextjs.org/docs/pages/building-your-application/data-fetching/incremental-static-regeneration#on-demand-revalidation),
and other features that make Makeswift work seamlessly with your Next.js app.
Next.js plugins are configured in the project's next.config.js file by wrapping `nextConfig`. The Makeswift Next.js plugin whitelists Makeswift image domains and sets up rewrites to enable draft mode in the Makeswift builder.
```js next.config.mjs
import createWithMakeswift from "@makeswift/runtime/next/plugin"
const withMakeswift = createWithMakeswift()
/** @type {import('next').NextConfig} */
const nextConfig = {
// your existing next config
}
export default withMakeswift(nextConfig)
```
```js next.config.js
const createWithMakeswift = require("@makeswift/runtime/next/plugin")
const withMakeswift = createWithMakeswift()
/** @type {import('next').NextConfig} */
const nextConfig = {
// your existing next config
}
export default withMakeswift(nextConfig)
```
Create a file for registered components called `src/makeswift/components.tsx`. In this example, only one component is registered. However, as you register more components, we recommend creating separate files for each component and rolling up the imports in the `src/makeswift/components.tsx` file. Learn more about [registering components](/developer/reference/runtime/register-component).
```tsx src/makeswift/components.tsx
import { runtime } from "@/makeswift/runtime";
import { Style } from "@makeswift/runtime/controls";
function HelloWorld(props) {
return
Once the API key is in your clipboard, open your [`.env.local`](https://nextjs.org/docs/pages/building-your-application/configuring/environment-variables) file and paste the snippet below.
```sh
MAKESWIFT_SITE_API_KEY=paste-your-api-key-here
```
Create the Makeswift [runtime](/developer/reference/runtime/constructor) file in `src/makeswift`.
```ts src/makeswift/runtime.ts
import { ReactRuntime } from "@makeswift/runtime/react";
export const runtime = new ReactRuntime();
```
Create the Makeswift [client](/developer/reference/client/constructor) file in `src/makeswift`.
```ts src/makeswift/client.ts
import { Makeswift } from "@makeswift/runtime/next";
import { strict } from "assert";
import { runtime } from "./runtime";
strict(
process.env.MAKESWIFT_SITE_API_KEY,
"MAKESWIFT_SITE_API_KEY is required"
);
export const client = new Makeswift(process.env.MAKESWIFT_SITE_API_KEY, {
runtime,
});
```
Similar to [NextAuth.js](https://next-auth.js.org/), Makeswift uses an API handler to communicate with your Next.js app. Create the file `src/app/api/makeswift/[...makeswift]/route.ts`.
It is important this file has that exact name and path. The extension can be
`.js` or `.ts`.
```tsx src/app/api/makeswift/[...makeswift]/route.ts
import { MakeswiftApiHandler } from "@makeswift/runtime/next/server";
import { strict } from "assert";
import { runtime } from "@/makeswift/runtime";
// make custom components' data available for introspection
import "@/makeswift/components";
strict(
process.env.MAKESWIFT_SITE_API_KEY,
"MAKESWIFT_SITE_API_KEY is required"
);
const handler = MakeswiftApiHandler(process.env.MAKESWIFT_SITE_API_KEY, {
runtime,
});
export { handler as GET, handler as POST };
```
This API route adds support for
[Draft Mode](https://nextjs.org/docs/app/building-your-application/configuring/draft-mode),
[on-demand revalidation](https://nextjs.org/docs/pages/building-your-application/data-fetching/incremental-static-regeneration#on-demand-revalidation),
and other features that make Makeswift work seamlessly with your Next.js app.
Next.js plugins are configured in the project's next.config.js file by wrapping `nextConfig`. The Makeswift Next.js plugin whitelists Makeswift image domains and sets up rewrites to enable draft mode in the Makeswift builder.
```js next.config.mjs
import createWithMakeswift from "@makeswift/runtime/next/plugin"
const withMakeswift = createWithMakeswift()
/** @type {import('next').NextConfig} */
const nextConfig = {
// your existing next config
}
export default withMakeswift(nextConfig)
```
```js next.config.js
const createWithMakeswift = require("@makeswift/runtime/next/plugin")
const withMakeswift = createWithMakeswift()
/** @type {import('next').NextConfig} */
const nextConfig = {
// your existing next config
}
export default withMakeswift(nextConfig)
```
Create a file for registered components called `src/makeswift/components.tsx`. In this example, only one component is registered. However, as you register more components, we recommend creating separate files for each component and rolling up the imports in the `src/makeswift/components.tsx` file. Learn more about [registering components](/developer/reference/runtime/register-component).
```tsx src/makeswift/components.tsx
import { runtime } from "@/makeswift/runtime";
import { Style } from "@makeswift/runtime/controls";
function HelloWorld(props) {
return Hello, world!
;
}
runtime.registerComponent(HelloWorld, {
type: "hello-world",
label: "Hello, world!",
props: {
className: Style(),
},
});
```
Create a client component for the Makeswift providers.
```tsx src/makeswift/provider.tsx
"use client";
import { runtime } from "@/makeswift/runtime";
import {
ReactRuntimeProvider,
RootStyleRegistry,
} from "@makeswift/runtime/next";
import "@/makeswift/components";
export function MakeswiftProvider({
children,
previewMode,
}: {
children: React.ReactNode;
previewMode: boolean;
}) {
return (
{children}
);
}
```
Make sure to import your `src/makeswift/components.tsx` file here to ensure your registered components are available in the builder.
In your root layout, wrap your app with the `MakeswiftProvider` component created in the last step and import the registered components.
```tsx src/app/layout.tsx
import type { Metadata } from "next";
import { draftMode } from "next/headers";
import { Inter } from "next/font/google";
import { MakeswiftProvider } from "@/makeswift/provider";
import "@/makeswift/components";
import "./globals.css";
const inter = Inter({ subsets: ["latin"] });
export const metadata: Metadata = {
title: "Create Next App",
description: "Generated by create next app",
};
export default async function RootLayout({
children,
}: Readonly<{
children: React.ReactNode;
}>) {
return (
{children}
);
}
```
Create an [optional catch-all route](https://nextjs.org/docs/app/building-your-application/routing/dynamic-routes#optional-catch-all-segments) named `[[...path]]`.
This catch-all route will fetch page data from `Makeswift` and pass it to be rendered in the `Page` component.
```tsx src/app/[[...path]]/page.tsx
import { getSiteVersion } from "@makeswift/runtime/next/server";
import { notFound } from "next/navigation";
import { Page as MakeswiftPage } from "@makeswift/runtime/next";
import { client } from "@/makeswift/client";
export async function generateStaticParams() {
const pages = await client.getPages().toArray();
return pages.map((page) => ({
path: page.path.split("/").filter((segment) => segment !== ""),
}));
}
export default async function Page({
params,
}: {
params: Promise<{ path?: string[] }>;
}) {
const path = "/" + ((await params)?.path ?? []).join("/");
const snapshot = await client.getPageSnapshot(path, {
siteVersion: getSiteVersion(),
});
if (snapshot == null) return notFound();
return ;
}
```
Delete the root page component `src/app/page.tsx` file to ensure that all pages (including the home page) are managed by Makeswift.
Optional catch-all routes match the parent route which, in this case, would be
the root page `/`. If you wanted to have a hard-coded home page (not managed
by Makeswift), you could use a (non-optional) catch-all route which does not
match the parent route and uses single brackets instead (ex. `[...path]`).
Run the local development script. This will start the Next.js app at `http://localhost:3000`.
```bash
npm run dev
```
If port `3000` is already in use, Next.js will try port `3001`, then `3002`, and so forth until it finds an
unused port.
Take note of this port for the next step.
Finally, open the Makeswift builder, navigate to **Settings > Host**, and add your app's URL. If you haven't changed anything in the example and the server is running on port `3000`, the app's URL should be
`http://localhost:3000`.
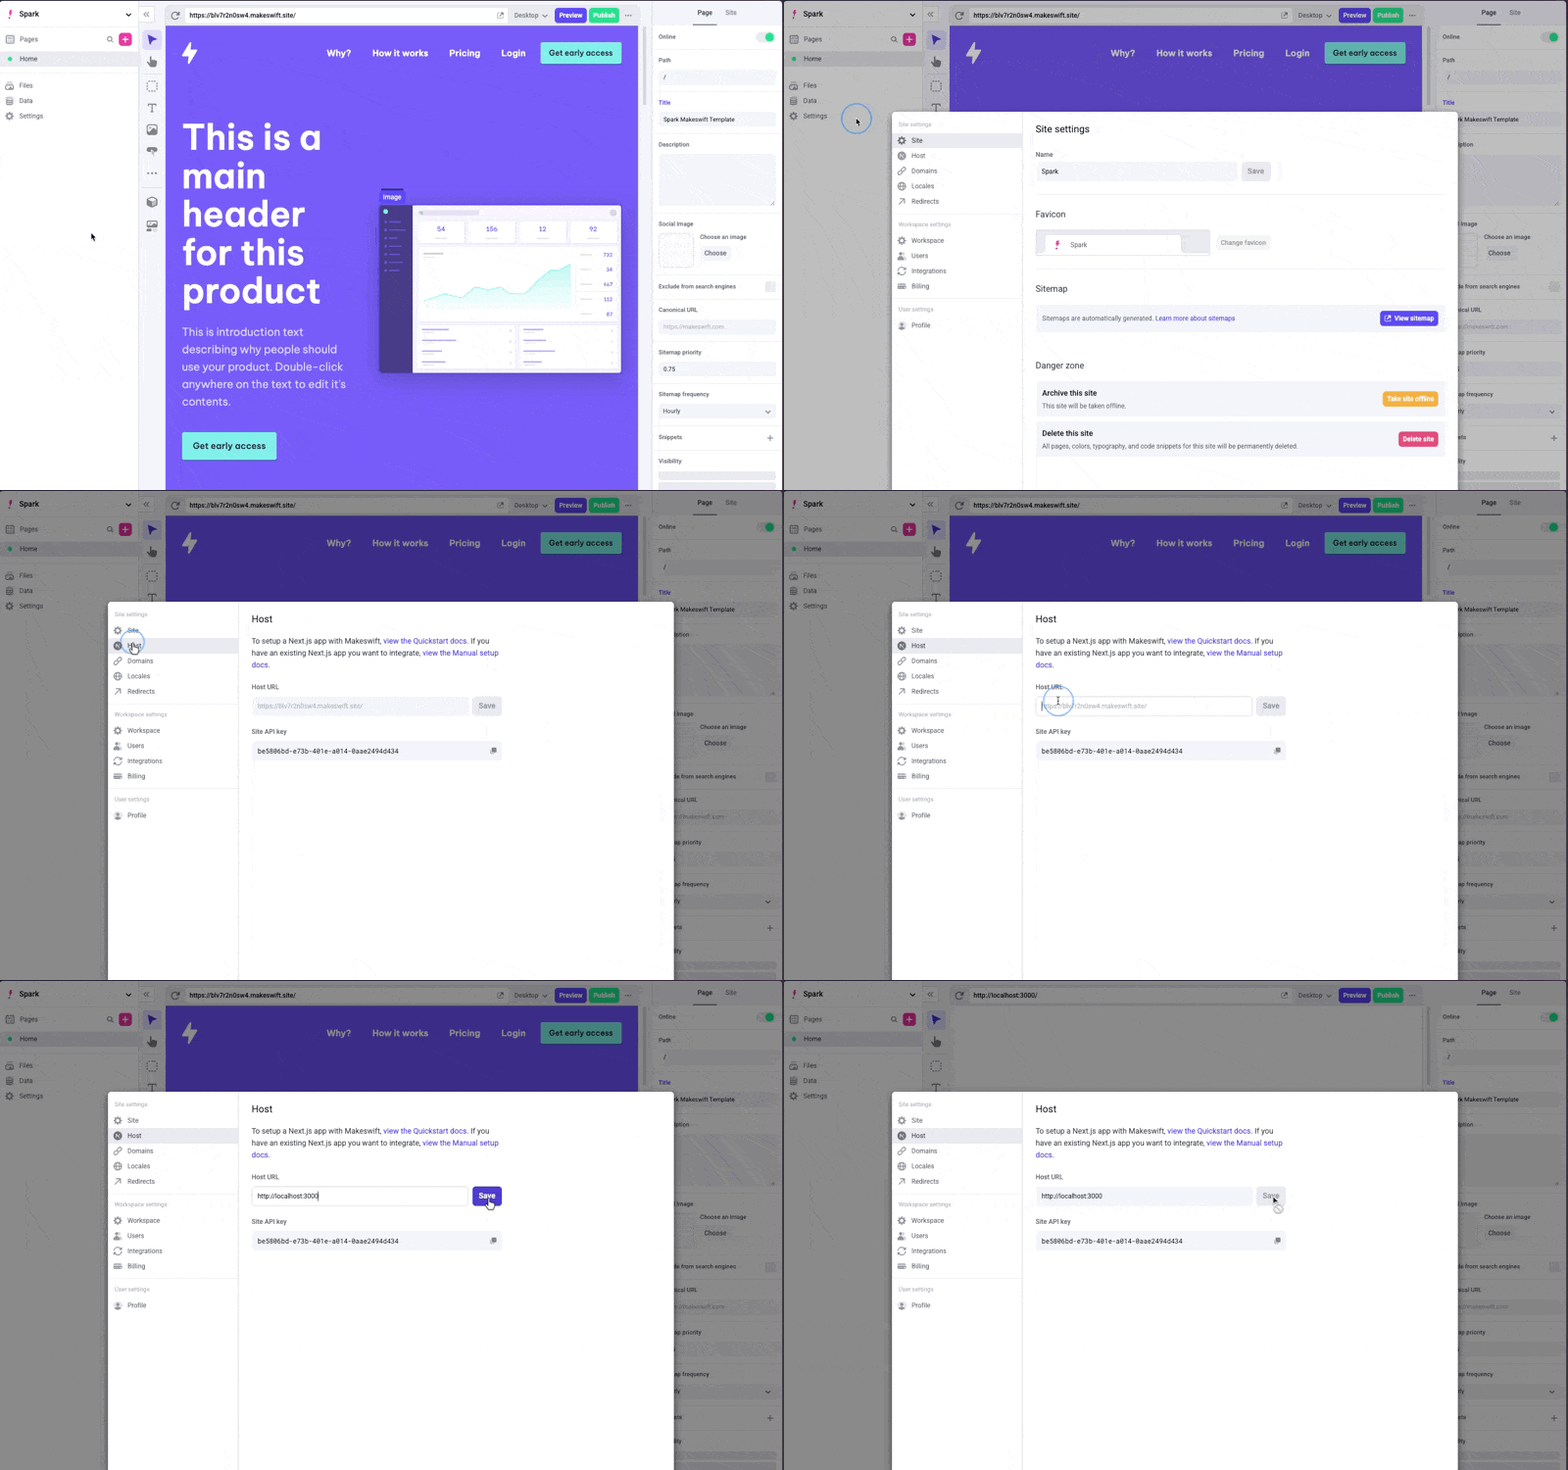 When you're ready to deploy, set up a separate site and use your deployment URL
instead of `http://localhost:3000`. You can keep this site for local development.
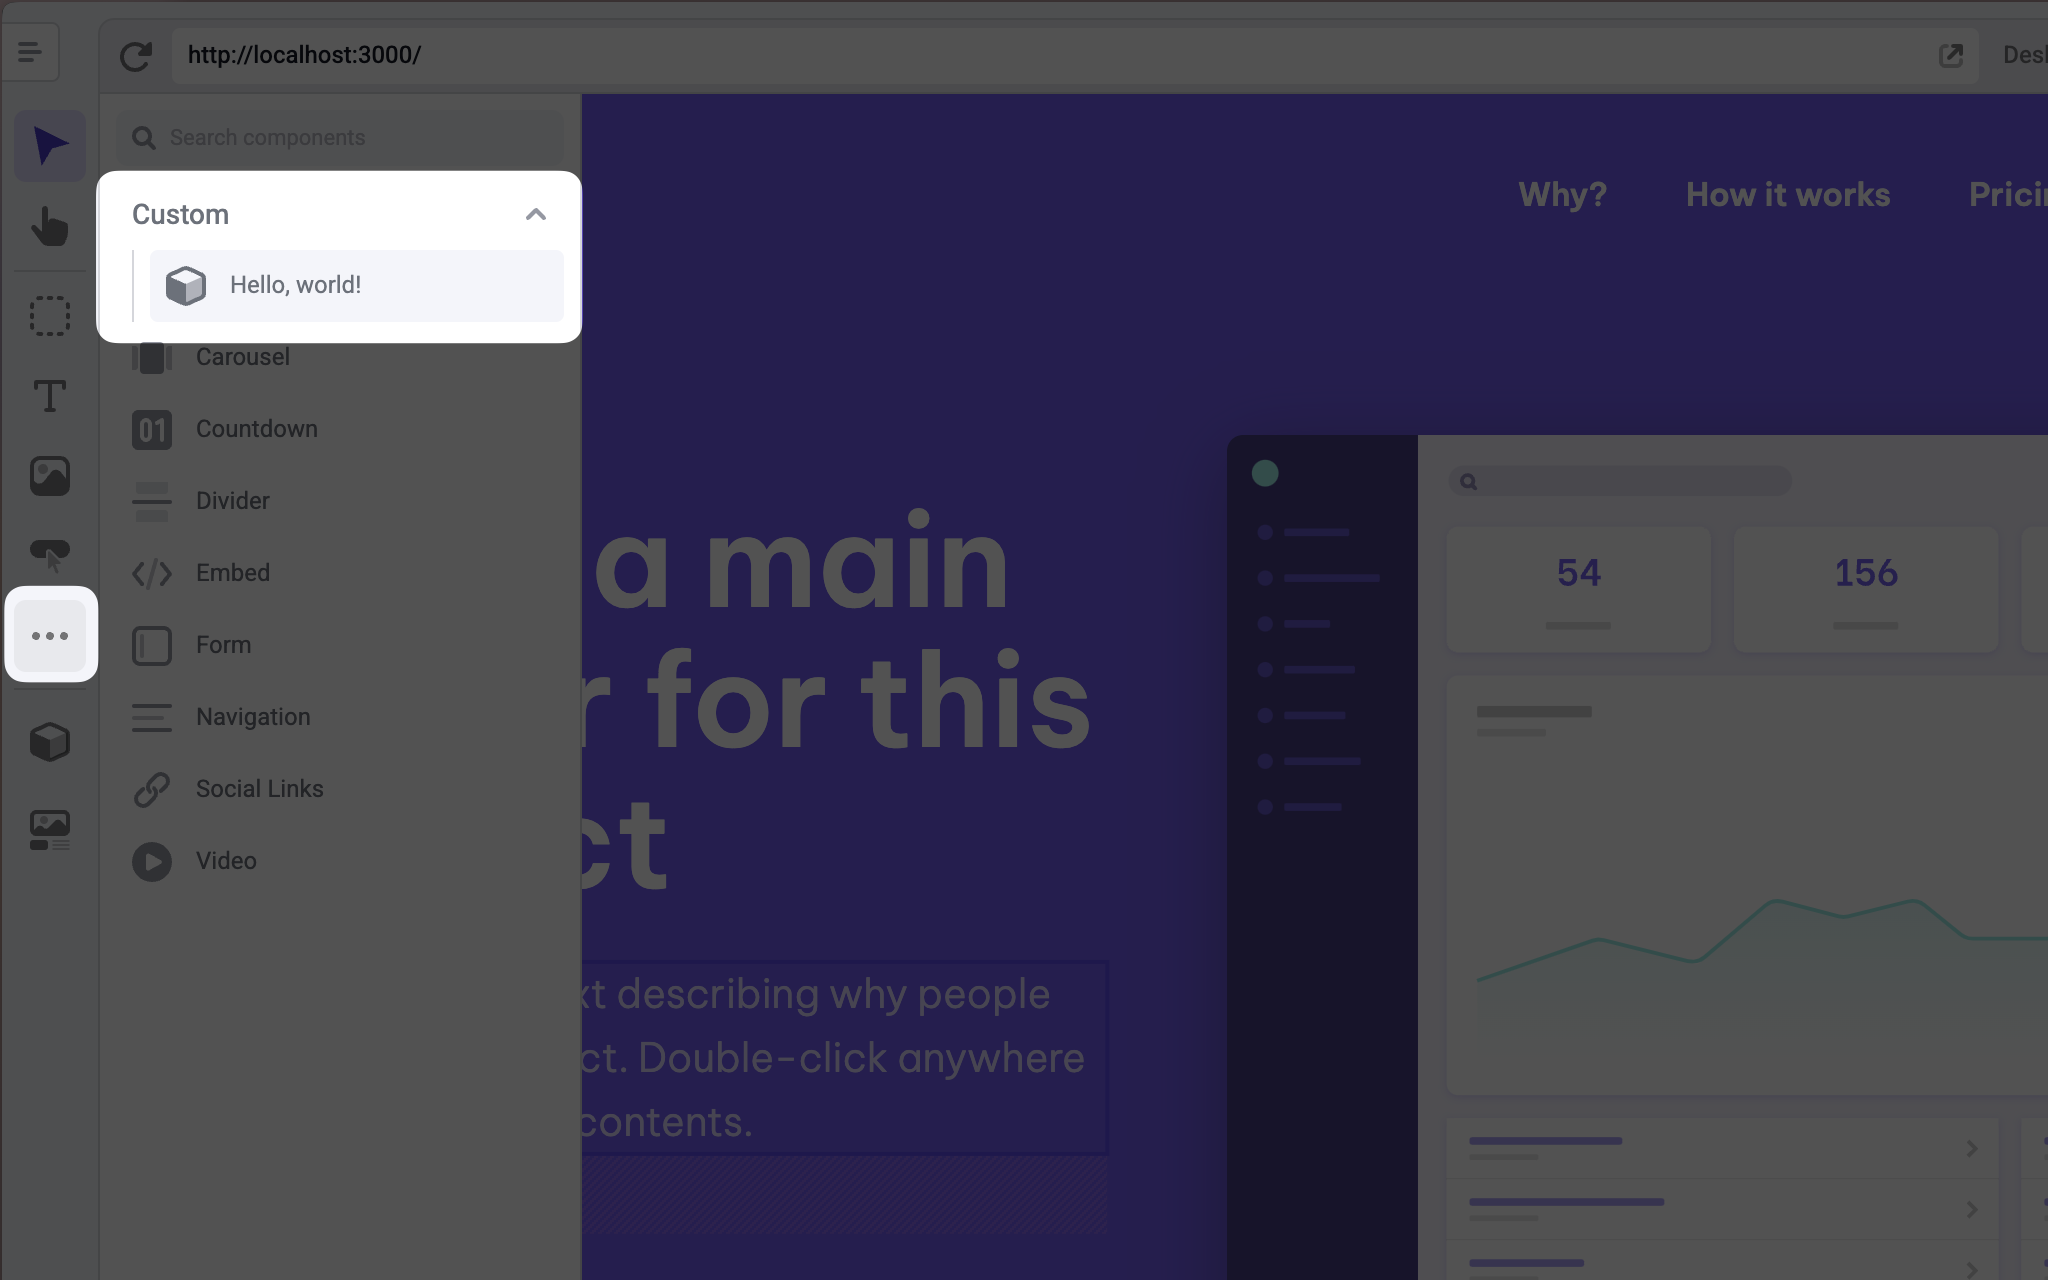
Great job! You should be able to create a page in Makeswift and start dropping in registered
components from the left toolbar.
When you're ready to deploy, set up a separate site and use your deployment URL
instead of `http://localhost:3000`. You can keep this site for local development.
Great job! You should be able to create a page in Makeswift and start dropping in registered
components from the left toolbar.